# maven
Maven 的本质是一个项目管理工具,将项目开发和管理过程抽象成一个项目对象模型(POM)。开发人员只需做一些简单的配置,就可以批量完成项目的构建、报告和文档的生成工作。
# 知识体系

# 简介
- Maven是项目管理工具,对软件项目提供构建与依赖管理
- Maven是 Apache下的Java开源项目
- Maven为Java项目提供了统一的管理方式,已成为业界标准
# 解决痛点
- 不同IDE项目的结构不一样,不利于不同人、团队开发
- 第三方jar下载、集成、版本更新步骤繁杂
- jar/war两种输出方式如何打包,不同的IDE有不同的配置
- 规范了构建生命周期
# 核心特性
- 项目结构、构建以及环境标准:项目设置遵循统一标准,并保证环境隔离。
- 依赖管理:强大的依赖管理,项目依赖组件自动下载、自动更新。
- 插件管理:可扩展的插件机制,使用简单,功能丰富。
# 使用
# 下载 (opens new window)
# 安装
- jdk或jre安装和配置
- 到官网下载maven
- 配置maven环境变量
- 打开cmd进行测试是否安装成功 mvn -v
- 和IDE进行整合
# 运行
# 命令行语法
Maven的cli语法如下:
mvn [options] [<goal(s)>] [<phase(s)>]
- options:可以通过 mvn -h 查看所有有效的options
- goal:有时候想通过Maven完成特定的任务,可以使用plugin,一个plugin包含一个或多个goal
- 比如:mvn archetype:generate 前一个archetype是插件标识,让Maven知道是哪个插件,generate是插件的goal,标记执行插件的哪个目标。
- phase:Maven有三类生命周期,每个生命周期包含多个phase
- clean - pre-clean, clean, post-clean
- default - validate, initialize, generate-sources, process-sources, generate-resources, process-resources, compile, process-classes, generate-test-sources, process-test-sources, generate-test-resources, process-test-resources, test-compile, process-test-classes, test, prepare-package, package, pre-integration-test, integration-test, post-integration-test, verify, install, deploy
- site - pre-site, site, post-site, site-deploy
# 常用命令

# 配置
Maven 可以通过三个地方进行配置,分别是:环境变量(跨项目全局配置)、settings.xml文件(跨项目全局配置)和.mvn目录(单项目配置)
https://maven.apache.org/configure.html (opens new window)
# 构建Web工程
# 其他教程和指南
- Apache Maven guide (opens new window)
- takari: Maven training-outline (opens new window)
- 使用阿里云Maven镜像 (opens new window)
- 在idea中使用maven
- Various Tips for Configuring Maven (opens new window)
- 核心配置文件详解
# 好的思路
# 项目结构标准
拥有通用的目录布局可以让熟悉一个 Maven 项目的用户立即在另一个 Maven 项目中感到宾至如归。
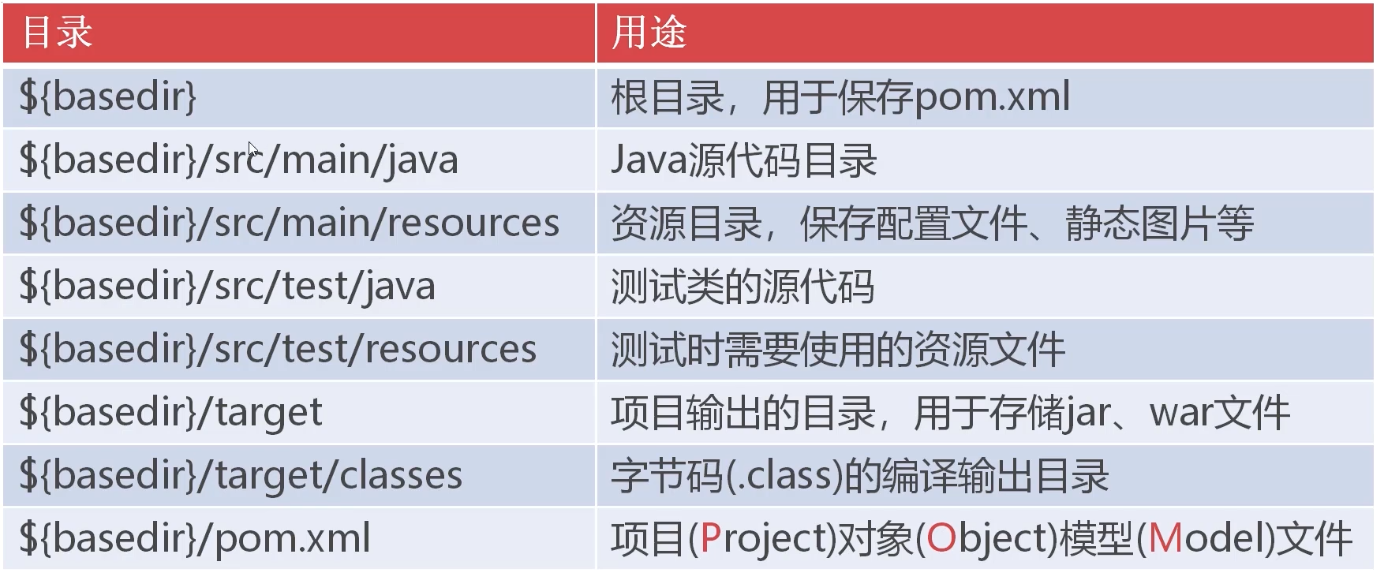
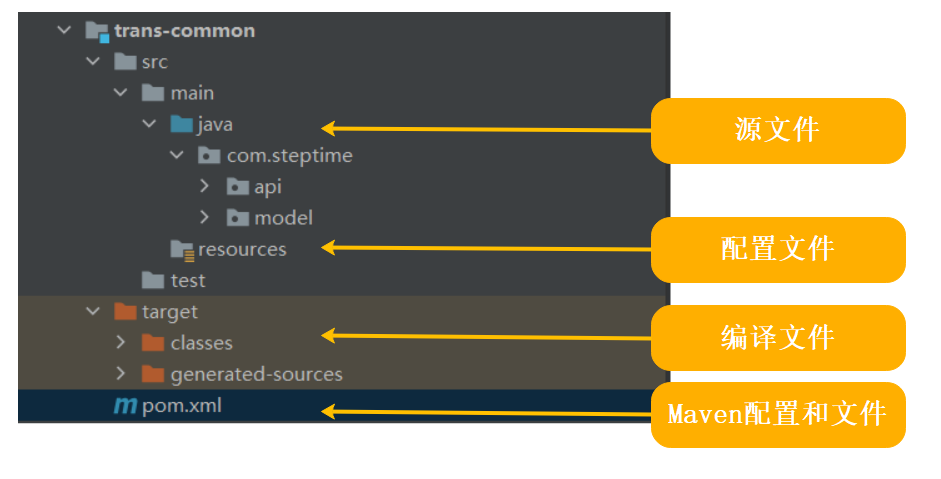
# 修改默认目录配置
在maven项目工程对应project的pom.xml中,在“<project>--<build>”节点下,你可以指定自己的目录路径信息:
<build>
    <!-- 目录信息维护,用户可以指定自己的目录路径 -->
    <sourceDirectory>E:\intellis\maven-principle\phase-echo\src\main\java</sourceDirectory>
    <scriptSourceDirectory>E:\intellis\maven-principle\phase-echo\src\main\scripts</scriptSourceDirectory>
    <testSourceDirectory>E:\intellis\maven-principle\phase-echo\src\test\java</testSourceDirectory>
    <outputDirectory>E:\intellis\maven-principle\phase-echo\target\classes</outputDirectory>
    <testOutputDirectory>E:\intellis\maven-principle\phase-echo\target\test-classes</testOutputDirectory>

    <!-- 注意,对resource而言,可以有很多个resource路径的配置,你只需要指定对应的路径是resource即可 -->
    <resources>
      <resource>
        <directory>E:\intellis\maven-principle\phase-echo\src\main\resources</directory>
      </resource>
    </resources>

    <!-- 注意,对resource而言,可以有很多个resource路径的配置,你只需要指定对应的路径是resource即可 -->
    <testResources>
      <testResource>
        <directory>E:\intellis\maven-principle\phase-echo\src\test\resources</directory>
      </testResource>
    </testResources>

    <directory>E:\intellis\maven-principle\phase-echo\target</directory>

</build>
# 构建流程标准(生命周期)
Maven不但有标准化的项目结构,而且还有一套标准化的构建流程,可以自动化实现编译,打包,发布,等等。
- Maven有三个内置的生成生命周期:default clean site。分别用于处理项目部署,处理项目清理和处理项目网站的创建。
- 默认构建生命周期(Default Lifeclyle): 该生命周期表示这项目的构建过程,定义了一个项目的构建要经过的不同的阶段。
- 清理生命周期(Clean Lifecycle): 该生命周期负责清理项目中的多余信息,保持项目资源和代码的整洁性。一般拿来清空directory(即一般的target)目录下的文件。
- 站点管理生命周期(Site Lifecycle) :向我们创建一个项目时,我们有时候需要提供一个站点,来介绍这个项目的信息,如项目介绍,项目进度状态、项目组成成员,版本控制信息,项目javadoc索引信息等等。站点管理生命周期定义了站点管理过程的各个阶段。
- 构建生命周期由多个阶段(Phases)组成。
一个典型的 Maven 构建(build)生命周期是由以下几个阶段的序列组成的:
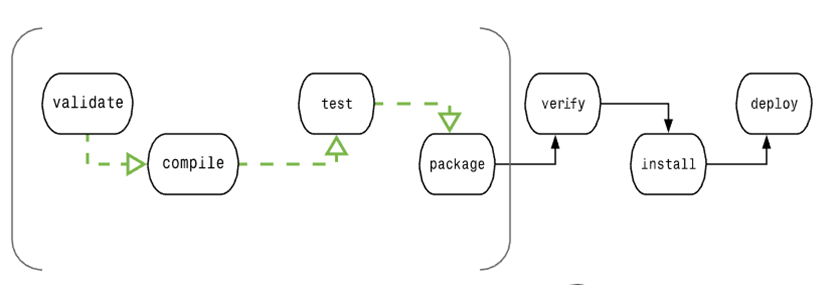
| 阶段 | 处理 | 描述 |
|---|---|---|
| 验证 validate | 验证项目 | 验证项目是否正确且所有必须信息是可用的 |
| 编译 compile | 执行编译 | 源代码编译在此阶段完成 |
| 测试 Test | 测试 | 使用适当的单元测试框架(例如JUnit)运行测试。 |
| 包装 package | 打包 | 创建JAR/WAR包如在 pom.xml 中定义提及的包 |
| 检查 verify | 检查 | 对集成测试的结果进行检查,以保证质量达标 |
| 安装 install | 安装 | 安装打包的项目到本地仓库,以供其他项目使用 |
| 部署 deploy | 部署 | 拷贝最终的工程包到远程仓库中,以共享给其他开发人员和工程 |
经常用到的phase其实只有几个:
- clean:清理
- compile:编译
- test:运行测试
- package:打包
# 环境标准
profile 是解决生成不同目标环境的不同配置的方法。跟SpringBoot中的profiles功能类似。我们可以通过profile和filter替换掉文件中的变量,也可以根据profile和resources 提取不同环境的文件。
# 依赖管理
maven通过pom.xml文件中配置的dependency(依赖组件坐标)自动下载、管理第三方Jar,并在工程中引用。
# 坐标
Maven可以通过坐标精确找到组件(第三方Jar)。
一个完整的坐标信息,由 groupId、artifactId、version、packaging、classifier 组成,如下是一个简单的坐标定义。
<groupId>org.SpringFramework</groupId>
<artifactId>spring-core</artifactId>
<version>4.2.7.RELEASE</version>
<packaging>jar</packaging>
# 1. groupId
定义当前 Maven 项目从属的实际项目。关于 groupId 的理解如下所示。
Maven 项目和实际项目不一定是一一对应的。比如 SpringFramework,它对应的 Maven 项目就有很多,如 spring-core、spring-context、spring-security 等。造成这样的原因是模块的概念,所以一个实际项目经常会被划分成很多模块。
groupId 不应该同开发项目的公司或组织对应。原因比较好理解,一个公司和一个组织会开发很多实际项目,如果用 groupId 对应公司和组织,那 artifactId 就只能是对应于每个实际项目了,而再往下的模块就没法描述了,而往往项目中的每个模块是以单独的形式形成构件,以便其他项目重复聚合使用。 groupId 的表述形式同 Java (opens new window) 包名的表述方式类似,通常与域名反向一一对应。
# 2. artifactId
定义实际项目中的一个 Maven 项目(实际项目中的一个模块)。
推荐命名的方式为:实际项目名称-模块名称。
比如,org.springframework 是实际项目名称,而现在用的是其中的核心模块,它的 artifactId 为 spring-core。
# 3. version
定义 Maven 当前所处的版本。如上的描述,用的是 4.2.7.RELEASE 版本。需要注意的是,Maven 中对版本号的定义是有一套规范的。具体规范请参考《版本管理 (opens new window)》的介绍。
# 4. packaging
定义 Maven 项目的打包方式。
打包方式通常与所生成的构件文件的扩展名对应,比如,.jar、.ear、.war、.pom 等。另外,打包方式是与工程构建的生命周期对应的。比如,jar 打包与 war 打包使用的命令是不相同的。最后需要注意的是,可以不指定 packaging,这时候 Maven 会自动默认成 jar。
# 5. classifier
定义构件输出的附属构件。
- 附属构件同主构件是一一对应的,比如上面的 spring-core-4.2.7.RELEASE.jar 是 spring-core Maven spring-core 项目的主构。
- Maven spring-core 项目除了可以生成上面的主构件外,也可以生成 spring-core-4.2.7.RELEASE-javadoc.java 和 spring-core-4.2.7.RELEASE-sources.jar 这样的附属构件。这时候,javadoc 和 sources 就是这两个附属构件的 classifier。这样就为主构件的每个附属构件也定义了一个唯一的坐标。
- 最后需要特别注意的是,不能直接定义一个 Maven 项目的 classifier,因为附属构件不是由 Maven 项目构建的时候直接默认生成的,而是由附加的其他插件生成的。
前面介绍的组成坐标的 5 个要素中,groupId、artifactId 和 version 是必需的,packaging 是可选的,默认是 jar,而 classifier 是不能直接定义的。同时,Maven 项目的构件文件名与坐标也是有对应关系的,一般规则是 artifactId-version[-classifier].packaging。
# 仓库
Maven仓库用来存放Maven管理的所有Jar包。分为:本地仓库、私服和远程仓库。 https://maven.apache.org/guides/introduction/introduction-to-repositories.html (opens new window)
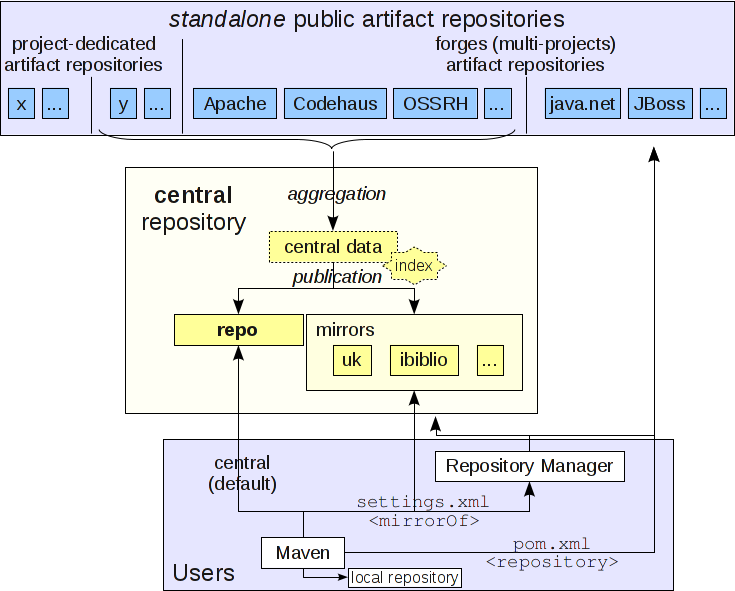
- 本地仓库
- 通过修改settings.xml配置文件的localRepository来修改本地仓库位置
- 通常,您不需要定期对本地存储库执行任何操作,除非在磁盘空间不足时将其清除。
- 修改镜像
 <mirror>
      <id>alimaven</id>
      <name>aliyun maven</name>
      <url>http://maven.aliyun.com/nexus/content/groups/public/</url>
      <mirrorOf>central</mirrorOf>
 </mirror>
- 私服
- 作用
- 代理 Maven中央仓库,加速 Maven依赖下载
- 作为本地缓存服务所有公司开发者
- 主流开源工具
- JFrog Artifactory开源版
- Nexus
- 作用
- 中央仓库&第三方仓库
- 当项目声明了本地仓库中不存在的依赖项(或者当远程存储库包含较新的依赖项时)。默认情况下,Maven 将从中央存储库&第三方仓库下载。
- 为了加快下载速度,可以为一个或多个仓库设置镜像。阿里云 (opens new window)
# 依赖机制
依赖关系管理是 Maven 的核心功能。管理单个项目的依赖项很容易。可以管理由数百个模块组成的多模块项目和应用进程的依赖项。Maven 在定义、创建和维护具有明确定义的类路径和库版本的可重现构建方面有很大帮助。 https://maven.apache.org/guides/introduction/introduction-to-dependency-mechanism.html (opens new window)
# 依赖下载
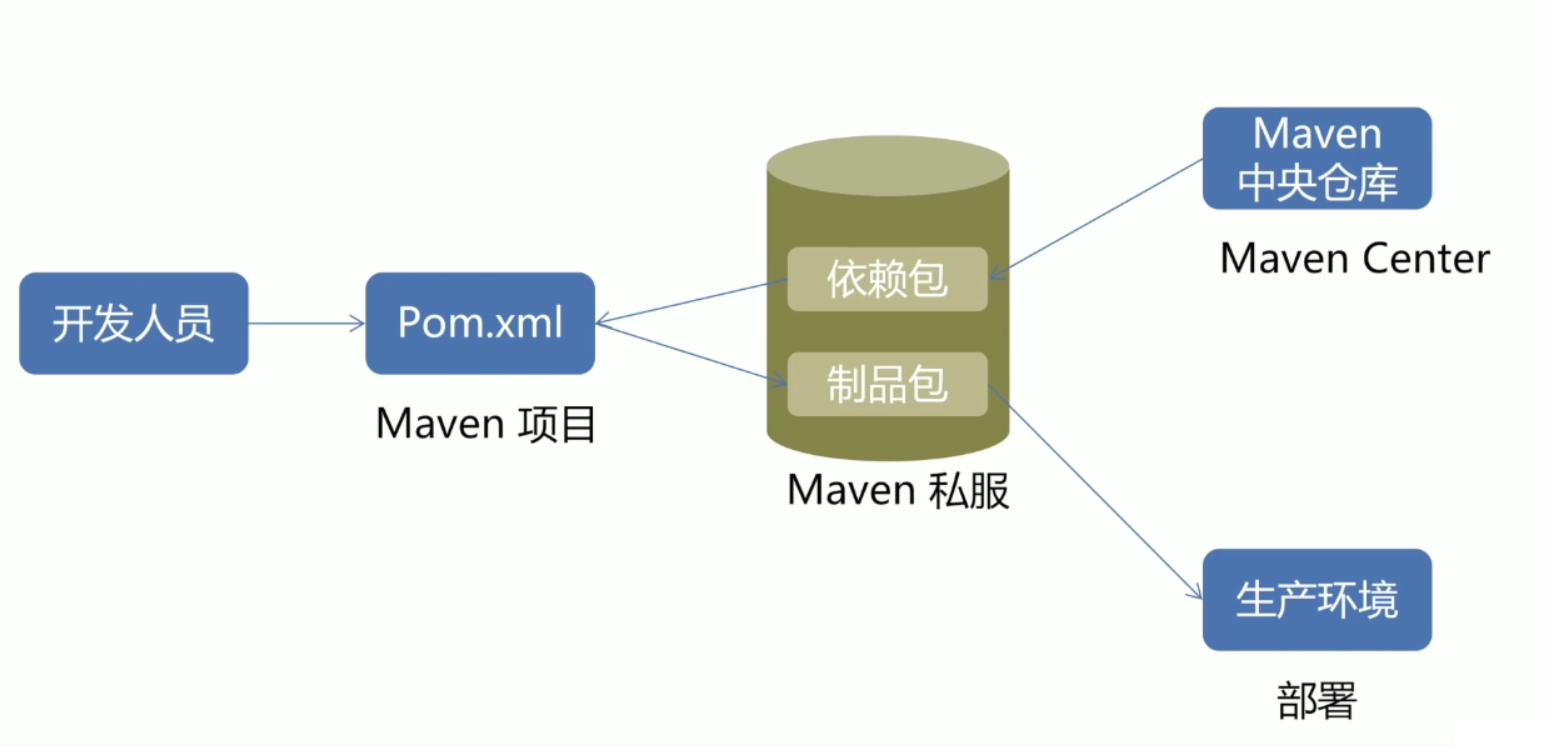
- 在pom.xml文件中配置项目依赖的第三方组件。
- maven会先到本地仓库看有没有。
- 若是没有,再找私服(公司服务器)。【如果没有配置私服,忽略】
- 私服要是没有,再从中央仓库下载。
<dependencies>
  <dependency>
    <groupId>mysql</groupId>
    <artifactId>mysql-connector-java</artifactId>
    <version>8.0.21</version>
  </dependency>
</dependencies>
相关的jar包可以通过 search.maven.org 进行搜索 maven默认会把开源的第三方jar的源码也下载下来
思考下:有些第三方jar又依赖了其他jar,那如果要手动下载是不是很麻烦?
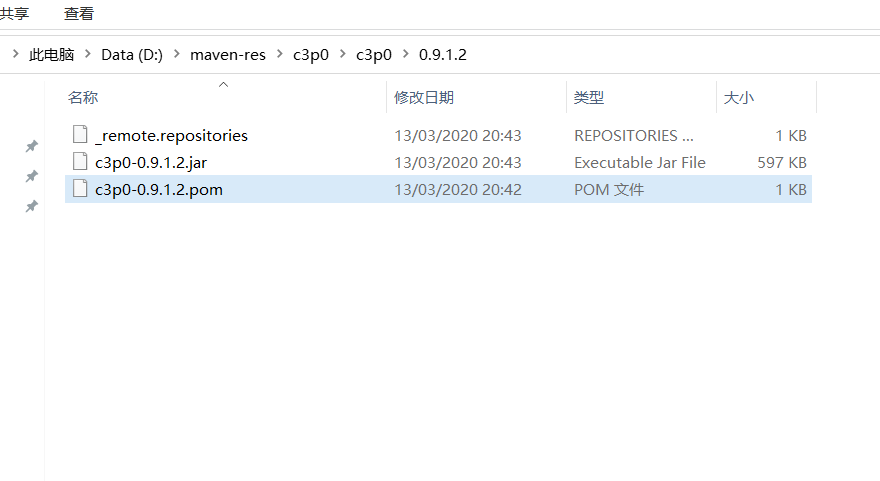
答案:在maven库中除了存储jar包,还存储着跟jar同名的pom文件,用来说明jar依赖的其他jar包。
# 传递依赖
- 依赖路径最短优先原则
- A -> B -> C -> X(1.0) A -> D -> X(2.0)
- 由于 X(2.0) 路径最短,所以使用 X(2.0)。
- 声明顺序优先原则
- A -> B -> X(1.0) A -> C -> X(2.0)
- 在 POM 中最先声明的优先,上面的两个依赖如果先声明 B,那么最后使用 X(1.0)。
- 覆写优先原则
- 子 POM 内声明的依赖优先于父 POM 中声明的依赖。
- 解决依赖冲突
- 找到 Maven 加载的 Jar 包版本,使用 mvn dependency:tree 查看依赖树,根据依赖原则来调整依赖在 POM 文件的声明顺序。
# 依赖范围
- Maven中的依赖作用范围概述
Maven中使用 scope 来指定当前包的依赖范围和依赖的传递性。常见的可选值有:compile, provided, runtime, test, system 等。scope 主要是用在 pom.xml 文件中的依赖定义部分,例如:
 <dependency>
    <groupId>junit</groupId>
    <artifactId>junit</artifactId>
    <version>4.12</version>
    <scope>test</scope>
</dependency>
- scope各种取值详解 | scope取值 | 有效范围(compile, runtime, test) | 依赖传递 | 例子 | | --- | --- | --- | --- | | compile | all | 是 | spring-core | | provided | compile, test | 否 | servlet-api | | runtime | runtime, test | 是 | JDBC驱动 | | test | test | 否 | JUnit | | system | compile, test | 是 | |
正如上表所示:
- compile :为默认的依赖有效范围。如果在定义依赖关系的时候,没有明确指定依赖有效范围的话,则默认采用该依赖有效范围。此种依赖,在编译、运行、测试时均有效。
- provided :在编译、测试时有效,但是在运行时无效。例如:servlet-api,运行项目时,容器已经提供,就不需要Maven重复地引入一遍了。
- runtime :在运行、测试时有效,但是在编译代码时无效。例如:JDBC驱动实现,项目代码编译只需要JDK提供的JDBC接口,只有在测试或运行项目时才需要实现上述接口的具体JDBC驱动。
- test :只在测试时有效,例如:JUnit。
- system :在编译、测试时有效,但是在运行时无效。和provided的区别是,使用system范围的依赖时必须通过systemPath元素显式地指定依赖文件的路径。由于此类依赖不是通过Maven仓库解析的,而且往往与本机系统绑定,可能造成构建的不可移植,因此应该谨慎使用。systemPath元素可以引用环境变量。例如:
<dependency>
    <groupId>javax.sql</groupId>
    <artifactId>jdbc</artifactId>
    <version>2.0</version>
    <scope>system</scope>
    <systemPath>${java.home}/lib/charsets.jar</systemPath>
</dependency>
# 依赖管理
以来管理主要用于管理 在POM 中使用的默认依赖项信息。
- 依赖关系管理部分是一种用于集中依赖关系信息的机制。当您有一组从公共父级继承的项目时,可以将有关依赖项的所有信息放在公共 POM 中,并对子 POM 中的项目进行更简单的引用。
- 依赖项管理部分的第二个非常重要的用途是控制传递依赖项中使用的项目版本,在子项目中你可以通过{groupId,artifactId} 依赖一个jar包。
- 注意:子项目不会自动依赖父级项目中依赖管理的依赖,子项目再定义依赖时不用在写version而已,这是依赖管理的核心。
<dependencyManagement>
    <dependencies>
        <dependency>
            <groupId>org.springframework.boot</groupId>
            <artifactId>spring-boot-dependencies</artifactId>
            <version>2.6.8</version>
            <type>pom</type>
            <scope>import</scope>
        </dependency>
        <dependency>
            <groupId>org.springframework.cloud</groupId>
            <artifactId>spring-cloud-dependencies</artifactId>
            <version>2021.0.1</version>
            <type>pom</type>
            <scope>import</scope>
        </dependency>
</dependencyManagement>
# 导入依赖
提供了聚合的方式用来整合依赖关系
一. 假设有项目P,其pom文件如下
<groupId>com</groupId>
//项目名称叫做P
<artifactId>P</artifactId>
<version>0.0.1-SNAPSHOT</version>
<packaging>pom</packaging>
//对A的版本进行了统一管理,P的子项目使用A的时候,可以不写<version>标签
<dependencyManagement>
		<dependencies>
			<dependency>
				  <groupId>com</groupId>
				  <artifactId>A</artifactId>
				  <version>0.0.1-SNAPSHOT</version>
			</dependency>
		</dependencies>
</dependencyManagement>
二. 现有P的子项目,这个子项目如果想使用A,有两种方式
//引用父项目P
<parent>
	<groupId>com</groupId>
	<artifactId>P</artifactId>
	<version>0.0.1-SNAPSHOT</version>
</parent>
//子项目使用A,可以不写version
<dependencies>
	<dependency>
		  <groupId>com.wentian</groupId>
		  <artifactId>A</artifactId>
		  //这里并没有使用<version>标签
	</dependency>
</dependencies>
//子项目使用A,注意使用import标签时,不再使用<parent>标签
<dependencies>
	<dependency>
		  <groupId>com.wentian</groupId>
		  <artifactId>A</artifactId>
		  //这里并没有使用<version>标签
	</dependency>
</dependencies>
//表示将父项目P的dependencyManagement拿到本POM中,不再继承parent
<dependencyManagement>
		<dependencies>
			<dependency>
				    <groupId>com</groupId>
					<artifactId>P</artifactId>
					<version>0.0.1-SNAPSHOT</version>
					<type>pom</type>//必须是type=pom
					<scope>import</scope>//必须是scope=import
			</dependency>
		</dependencies>
</dependencyManagement>
# 模块的聚合与继承
Maven的聚合特性(aggregation)能够使项目的多个模块聚合在一起构建, 而继承特性(inheritance)能够帮助抽取各模块相同的依赖、插件等配置,在简化模块配置的同时, 保持各模块一致.
# 模块聚合
随着项目越来越复杂(需要解决的问题越来越多、功能越来越重), 我们更倾向于将一个项目划分几个模块并行开发, 如: 将feedcenter-push项目划分为client、core和web三个模块, 而我们又想一次构建所有模块, 而不是针对各模块分别执行$ mvn命令. 于是就有了Maven的模块聚合 -> 将feedcenter-push作为聚合模块将其他模块聚集到一起构建:
- 聚合POM 聚合模块POM仅仅是帮助聚合其他模块构建的工具, 本身并无实质内容:
<project xmlns="http://maven.apache.org/POM/4.0.0"
         xmlns:xsi="http://www.w3.org/2001/XMLSchema-instance"
         xsi:schemaLocation="http://maven.apache.org/POM/4.0.0
         http://maven.apache.org/xsd/maven-4.0.0.xsd">

    <modelVersion>4.0.0</modelVersion>

    <groupId>com.vdian.feedcenter</groupId>
    <artifactId>feedcenter-push</artifactId>
    <packaging>pom</packaging>
    <version>1.0.0.SNAPSHOT</version>

    <modules>
        <module>feedcenter-push-client</module>
        <module>feedcenter-push-core</module>
        <module>feedcenter-push-web</module>
    </modules>

</project>
- 通过在一个打包方式为pom的Maven项目中声明任意数量的module以实现模块聚合:
- packaging: pom, 否则无法聚合构建.
- modules: 实现聚合的核心,module值为被聚合模块相对于聚合POM的相对路径, 每个被聚合模块下还各自包含有_pom.xml_、src/main/java、_src/test/java_等内容, 离开聚合POM也能够独立构建(注: 模块所处目录最好与其**artifactId**一致).
Tips: 推荐将聚合POM放在项目目录的最顶层, 其他模块作为聚合模块的子目录. 其他关于聚合与反应堆介绍可参考: Guide to Working with Multiple Modules (opens new window).
# 模块继承
在面向对象中, 可以通过类继承实现复用. 在Maven中同样也可以创建**POM的父子结构, 通过在父POM中声明一些配置供子POM继承**来实现复用与消除重复:
# 1. 父POM
与聚合类似, 父POM的打包方式也是pom, 因此可以继续复用聚合模块的POM(这也是在开发中常用的方式):
<project xmlns="http://maven.apache.org/POM/4.0.0"
         xmlns:xsi="http://www.w3.org/2001/XMLSchema-instance"
         xsi:schemaLocation="http://maven.apache.org/POM/4.0.0
         http://maven.apache.org/xsd/maven-4.0.0.xsd">

    <modelVersion>4.0.0</modelVersion>

    <groupId>com.vdian.feedcenter</groupId>
    <artifactId>feedcenter-push</artifactId>
    <packaging>pom</packaging>
    <version>1.0.0.SNAPSHOT</version>

    <modules>
        <module>feedcenter-push-client</module>
        <module>feedcenter-push-core</module>
        <module>feedcenter-push-web</module>
    </modules>

    <properties>
        <finalName>feedcenter-push</finalName>
        <warName>${finalName}.war</warName>
        <spring.version>4.0.6.RELEASE</spring.version>
        <junit.version>4.12</junit.version>
        <project.build.sourceEncoding>UTF-8</project.build.sourceEncoding>
        <warExplodedDirectory>exploded/${warName}</warExplodedDirectory>
    </properties>

    <dependencyManagement>
        <dependencies>
            <dependency>
                <groupId>org.springframework</groupId>
                <artifactId>spring-core</artifactId>
                <version>${spring.version}</version>
            </dependency>
            <dependency>
                <groupId>org.springframework</groupId>
                <artifactId>spring-beans</artifactId>
                <version>${spring.version}</version>
            </dependency>
            <dependency>
                <groupId>org.springframework</groupId>
                <artifactId>spring-context</artifactId>
                <version>${spring.version}</version>
            </dependency>

           <dependency>
                <groupId>junit</groupId>
                <artifactId>junit</artifactId>
                <version>${junit.version}</version>
                <scope>test</scope>
            </dependency>
        </dependencies>
    </dependencyManagement>

    <build>
        <pluginManagement>
            <plugins>
                <plugin>
                    <groupId>org.apache.maven.plugins</groupId>
                    <artifactId>maven-source-plugin</artifactId>
                    <version>3.0.0</version>
                    <executions>
                        <execution>
                            <id>attach-sources</id>
                            <phase>verify</phase>
                            <goals>
                                <goal>jar-no-fork</goal>
                            </goals>
                        </execution>
                    </executions>
                </plugin>
            </plugins>
        </pluginManagement>
    </build>
</project>
- dependencyManagement: 能让子POM继承父POM的配置的同时, 又能够保证子模块的灵活性: 在父POMdependencyManagement元素配置的依赖声明不会实际引入子模块中, 但能够约束子模块dependencies下的依赖的使用(子模块只需配置groupId与artifactId, 见下)。
- pluginManagement: 与dependencyManagement类似, 配置的插件不会造成实际插件的调用行为, 只有当子POM中配置了相关plugin元素, 才会影响实际的插件行为。
# 2. 子POM
<?xml version="1.0" encoding="UTF-8"?>
<project xmlns="http://maven.apache.org/POM/4.0.0"
         xmlns:xsi="http://www.w3.org/2001/XMLSchema-instance"
         xsi:schemaLocation="http://maven.apache.org/POM/4.0.0
         http://maven.apache.org/xsd/maven-4.0.0.xsd">

    <parent>
        <groupId>com.vdian.feedcenter</groupId>
        <artifactId>feedcenter-push</artifactId>
        <version>1.0.0.SNAPSHOT</version>
    </parent>
    <modelVersion>4.0.0</modelVersion>

    <artifactId>feedcenter-push-client</artifactId>

    <dependencies>
        <dependency>
            <groupId>org.springframework</groupId>
            <artifactId>spring-core</artifactId>
        </dependency>
        <dependency>
            <groupId>org.springframework</groupId>
            <artifactId>spring-context</artifactId>
        </dependency>
        <dependency>
            <groupId>org.springframework</groupId>
            <artifactId>spring-beans</artifactId>
        </dependency>

        <dependency>
            <groupId>junit</groupId>
            <artifactId>junit</artifactId>
        </dependency>
    </dependencies>

    <build>
        <plugins>
            <plugin>
                <groupId>org.apache.maven.plugins</groupId>
                <artifactId>maven-source-plugin</artifactId>
            </plugin>
            <plugin>
                <groupId>org.apache.maven.plugins</groupId>
                <artifactId>maven-compiler-plugin</artifactId>
            </plugin>
        </plugins>
    </build>

</project>
- 元素继承
可以看到, 子POM中并未定义模块groupId与version, 这是因为子POM默认会从父POM继承了如下元素:
- groupId、version
- dependencies
- developers and contributors
- plugin lists (including reports)
- plugin executions with matching ids
- plugin configuration
- resources 因此所有的**springframework**都省去了version、junit还省去了scope, 而且插件还省去了executions与configuration配置, 因为完整的声明已经包含在父POM中.
- 优势: 当依赖、插件的版本、配置等信息在父POM中声明之后, 子模块在使用时就无须声明这些信息, 也就不会出现多个子模块使用的依赖版本不一致的情况, 也就降低了依赖冲突的几率. 另外如果子模块不显式声明依赖与插件的使用, 即使已经在父POM的dependencyManagement、pluginManagement中配置了, 也不会产生实际的效果.
- 推荐: 模块继承与模块聚合同时进行,这意味着, 你可以为你的所有模块指定一个父工程, 同时父工程中可以指定其余的Maven模块作为它的聚合模块. 但需要遵循以下三条规则:
- 在所有子POM中指定它们的父POM;
- 将父POM的packaging值设为pom;
- 在父POM中指定子模块/子POM的目录.
注: parent元素内还包含一个relativePath元素, 用于指定父POM的相对路径, 默认../pom.xml.
# 3. 超级pom-约定优先于配置
任何一个Maven项目都隐式地继承自超级POM, 因此超级POM的大量配置都会被所有的Maven项目继承, 这些配置也成为了Maven所提倡的约定.
<!-- START SNIPPET: superpom -->
<project>
  <modelVersion>4.0.0</modelVersion>

  <!-- 定义了中央仓库以及插件仓库, 均为:https://repo.maven.apache.org/maven2 -->
  <repositories>
    <repository>
      <id>central</id>
      <name>Central Repository</name>
      <url>https://repo.maven.apache.org/maven2</url>
      <layout>default</layout>
      <snapshots>
        <enabled>false</enabled>
      </snapshots>
    </repository>
  </repositories>

  <pluginRepositories>
    <pluginRepository>
      <id>central</id>
      <name>Central Repository</name>
      <url>https://repo.maven.apache.org/maven2</url>
      <layout>default</layout>
      <snapshots>
        <enabled>false</enabled>
      </snapshots>
      <releases>
        <updatePolicy>never</updatePolicy>
      </releases>
    </pluginRepository>
  </pluginRepositories>

  <!-- 依次定义了各类代码、资源、输出目录及最终构件名称格式, 这就是Maven项目结构的约定 -->
  <build>
    <directory>${project.basedir}/target</directory>
    <outputDirectory>${project.build.directory}/classes</outputDirectory>
    <finalName>${project.artifactId}-${project.version}</finalName>
    <testOutputDirectory>${project.build.directory}/test-classes</testOutputDirectory>
    <sourceDirectory>${project.basedir}/src/main/java</sourceDirectory>
    <scriptSourceDirectory>${project.basedir}/src/main/scripts</scriptSourceDirectory>
    <testSourceDirectory>${project.basedir}/src/test/java</testSourceDirectory>
    <resources>
      <resource>
        <directory>${project.basedir}/src/main/resources</directory>
      </resource>
    </resources>
    <testResources>
      <testResource>
        <directory>${project.basedir}/src/test/resources</directory>
      </testResource>
    </testResources>

    <!-- 为核心插件设定版本 -->
    <pluginManagement>
      <!-- NOTE: These plugins will be removed from future versions of the super POM -->
      <!-- They are kept for the moment as they are very unlikely to conflict with lifecycle mappings (MNG-4453) -->
      <plugins>
        <plugin>
          <artifactId>maven-antrun-plugin</artifactId>
          <version>1.3</version>
        </plugin>
        <plugin>
          <artifactId>maven-assembly-plugin</artifactId>
          <version>2.2-beta-5</version>
        </plugin>
        <plugin>
          <artifactId>maven-dependency-plugin</artifactId>
          <version>2.8</version>
        </plugin>
        <plugin>
          <artifactId>maven-release-plugin</artifactId>
          <version>2.3.2</version>
        </plugin>
      </plugins>
    </pluginManagement>
  </build>

  <!-- 定义项目报告输出路径 -->
  <reporting>
    <outputDirectory>${project.build.directory}/site</outputDirectory>
  </reporting>

  <!-- 定义release-profile, 为构件附上源码与文档 -->
  <profiles>
    <!-- NOTE: The release profile will be removed from future versions of the super POM -->
    <profile>
      <id>release-profile</id>

      <activation>
        <property>
          <name>performRelease</name>
          <value>true</value>
        </property>
      </activation>

      <build>
        <plugins>
          <plugin>
            <inherited>true</inherited>
            <artifactId>maven-source-plugin</artifactId>
            <executions>
              <execution>
                <id>attach-sources</id>
                <goals>
                  <goal>jar</goal>
                </goals>
              </execution>
            </executions>
          </plugin>
          <plugin>
            <inherited>true</inherited>
            <artifactId>maven-javadoc-plugin</artifactId>
            <executions>
              <execution>
                <id>attach-javadocs</id>
                <goals>
                  <goal>jar</goal>
                </goals>
              </execution>
            </executions>
          </plugin>
          <plugin>
            <inherited>true</inherited>
            <artifactId>maven-deploy-plugin</artifactId>
            <configuration>
              <updateReleaseInfo>true</updateReleaseInfo>
            </configuration>
          </plugin>
        </plugins>
      </build>
    </profile>
  </profiles>

</project>
<!-- END SNIPPET: superpom -->
附: Maven继承与组合的其他信息还可参考: Introduction to the POM (opens new window).
# 插件管理
- Plugin Development (opens new window)
- Configuring Plug-ins (opens new window)
- Plugin Prefix Resolution (opens new window)
- Developing Java Plugins (opens new window)
# 常见问题
- 网络问题导致下载失败
- 比较多的情况是,maven会因为网络的原因,而仓库里并没有下载到jar包,而只有
.jar.lastupdate和.pom这2个文件。而查看pom.xml文件的时候也不会报错。那么久需要删除本地仓库中,这个包的目录,重新下载。
- 比较多的情况是,maven会因为网络的原因,而仓库里并没有下载到jar包,而只有
- 依赖冲突
- 了解你的依赖
- mvn dependency: tree
- IDEA Maven Helper插件
- 排除特定依赖
- exclusion
- 统一管理依赖
- dependency management
- Bill of Materials-bom
- 了解你的依赖
# 核心实现原理
# 资料
- Maven Tutorial (opens new window)
- JAVA-TUTORIAL (opens new window)
- Maven:mirror和repository 区别 (opens new window)
- Maven三种仓库的配置 (opens new window)
- Maven中的几个重要概念:lifecycle, phase 和 goal (opens new window)
- Maven提高篇系列 (opens new window)
- Maven 核心原理 (opens new window)
- Maven 源码解析 (opens new window)
- Maven-dependencyManagement与import (opens new window)
